
Creating a Production WebServer for a Python Flask App
I recently needed to setup a production server to host a new Python Flask based web app. Much to my surprise it turned out to be a laborious process. I expected to do some quick googling, followed by a hasty 30 min CLI session, but as is often the case, there were quite a few detailed steps required to get it just right. The aforementioned Google search did reveal a plethora of artices on ‘setting up a Flask web server’, but they were all very similar and none of them covered the myriad of steps required. I ended up abandoning these articles and instead spending a few hours painstakingly trawling through the original documentation for Flask, Ubuntu, Nginx and Gunicorn in order to get it just right. I’ve prepared this guide to save you the trouble I had. I’ve tried to make it as concise as possible while not leaving out any steps along the way. I hope you find it useful.
I checked the Flask documentation and chose Nginx as my web server and Gunicorn as my gateway interface (WSGI). Basically, Nginx serves up any static html and css and Gunicorn interprets the Python code.
When it comes to web servers in general I usually choose Amazon Linux 2 or Ubuntu. The Flask documentation seemed to provide good coverage for Ubuntu so I launched an Ubuntu v20.04 instance on AWS EC2.
Ubuntu on AWS EC2 or on a more generic server provider
This guide assumes you’re going to use a Linux Ubuntu server on the AWS EC2 service. However, I realise that you may be using alternative providers so I’ve included full instructions on doing things outside of AWS too. The two main differences between using AWS and a more generic server provider is that with AWS you don’t have to install a firewall and you don’t need to setup your own restricted linux user or your own SSH access tokens. In order to keep this post flowing, I’ll stick to the AWS way of doing things, but I will include an additional section at the bottom that explains how to create a simple firewall and how to create a new restricted user and use your own SSH tokens for non password access to the server.
Python Flask on AWS EC2 Ubuntu
As mentioned, I’m going to keep this as concise as possible while covering all the bases.
First we need a new server
- Launch an Ubuntu server on AWS. The latest server available as of this writing is v20.04 and that’s the one I chose. From the AWS EC2 screen click on Instances > Launch Instance > Ubuntu Server 20.04 LTS (HVM), SSD Volume Type > Select:

- Next you need to choose the size of your server. You can choose a t2.micro if you’re just following along with this guide, but for production you generally want to choose an m5.large or m5.xlarge. You can check the prices on the Amazon EC2 Guide or check out this excellent 3rd party EC2 Guide.
Scroll to the bottom of the screen but don’t click on the blue ‘Review and Launch’ button. Instead click on the step by step buttons to the right of the blue button. Keep clicking through until you get to the Tags screen. Here you can click on Add Tags and enter a key:value pair of ‘Name’ and ‘flask-server’ or choose any name you like. Then go to the next screen by clicking on the Next: Configure Security Group button.
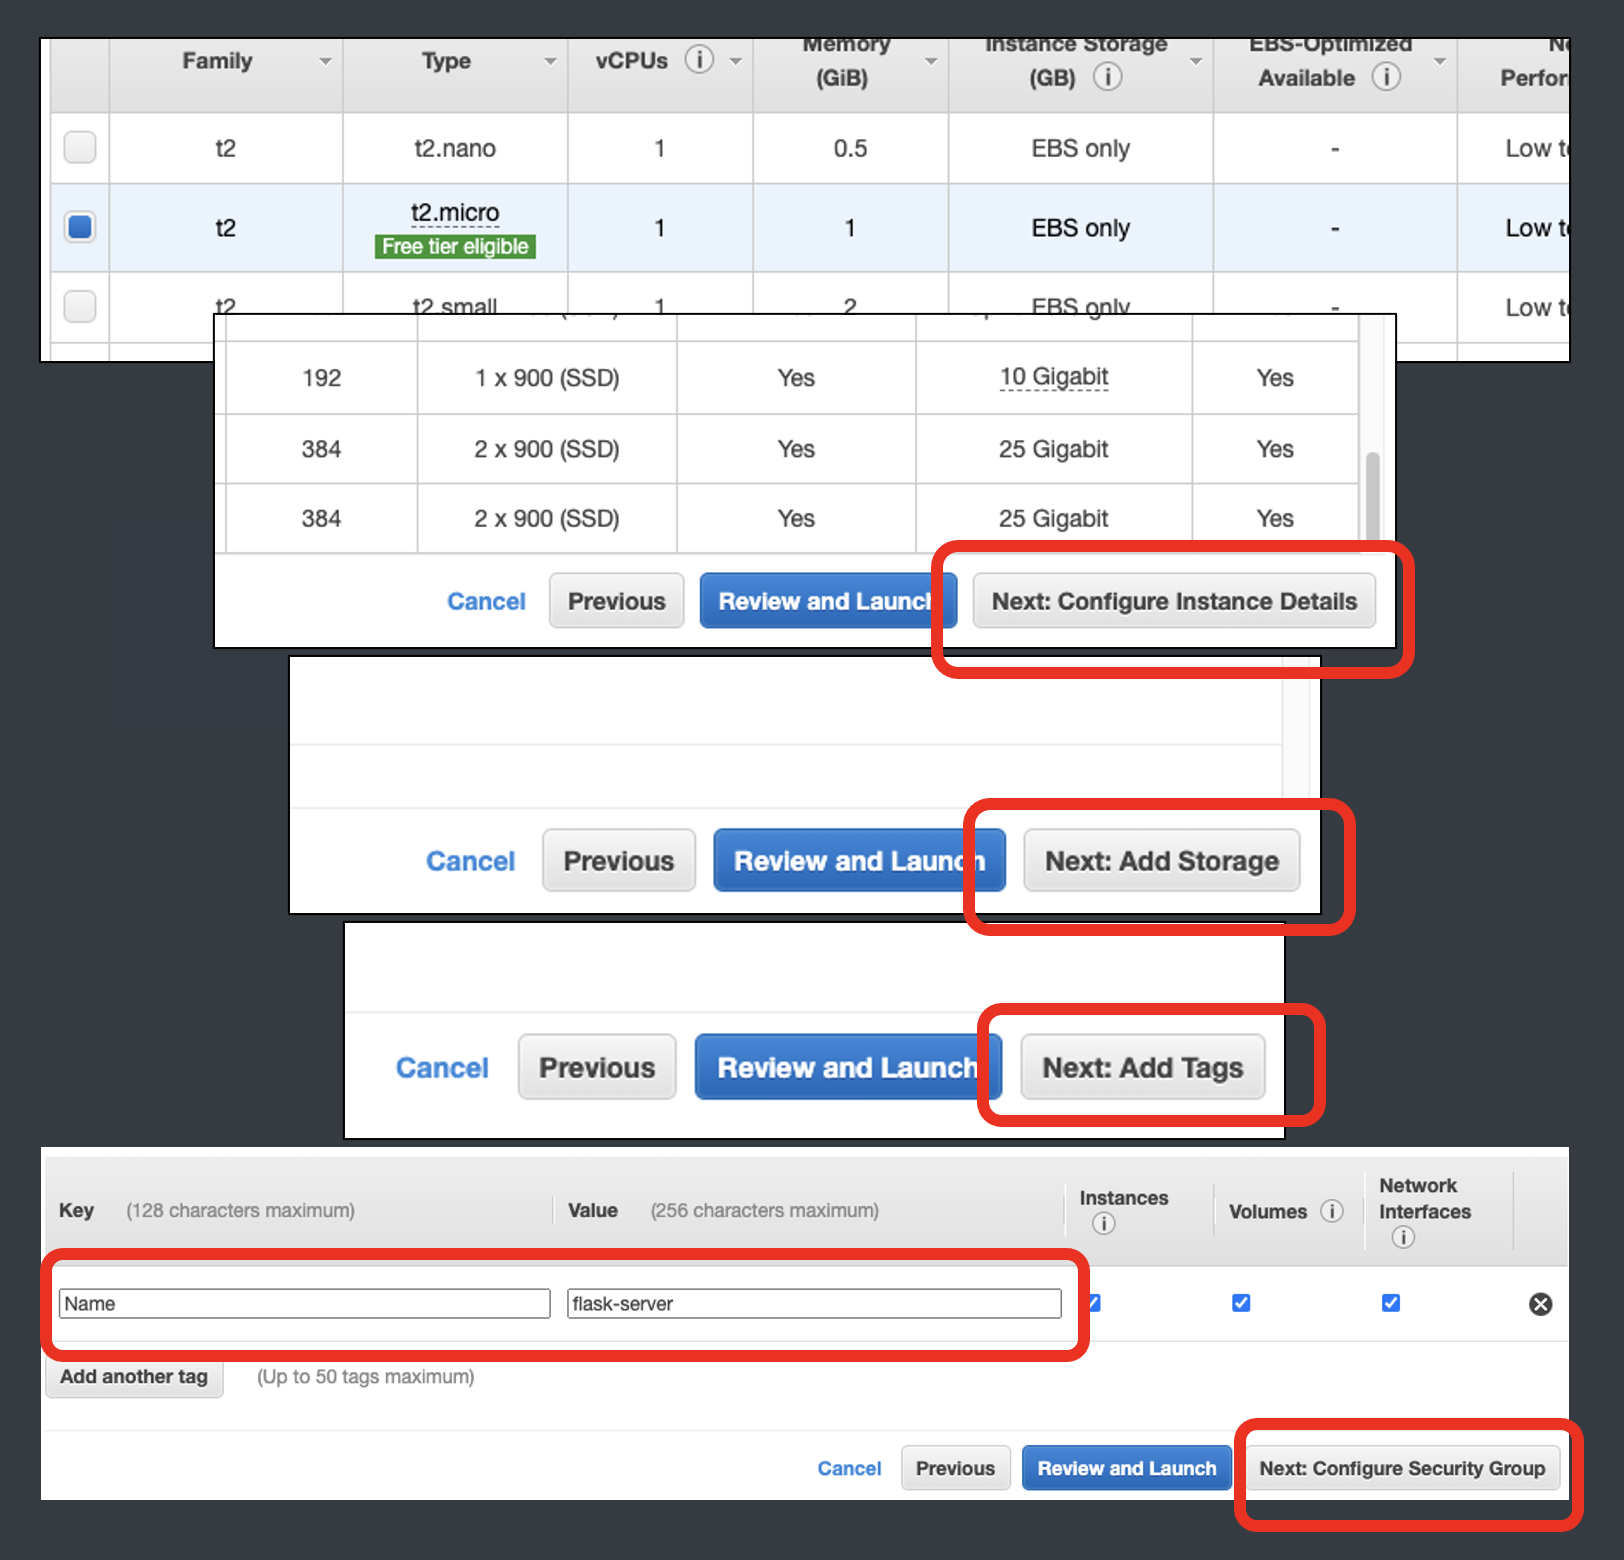
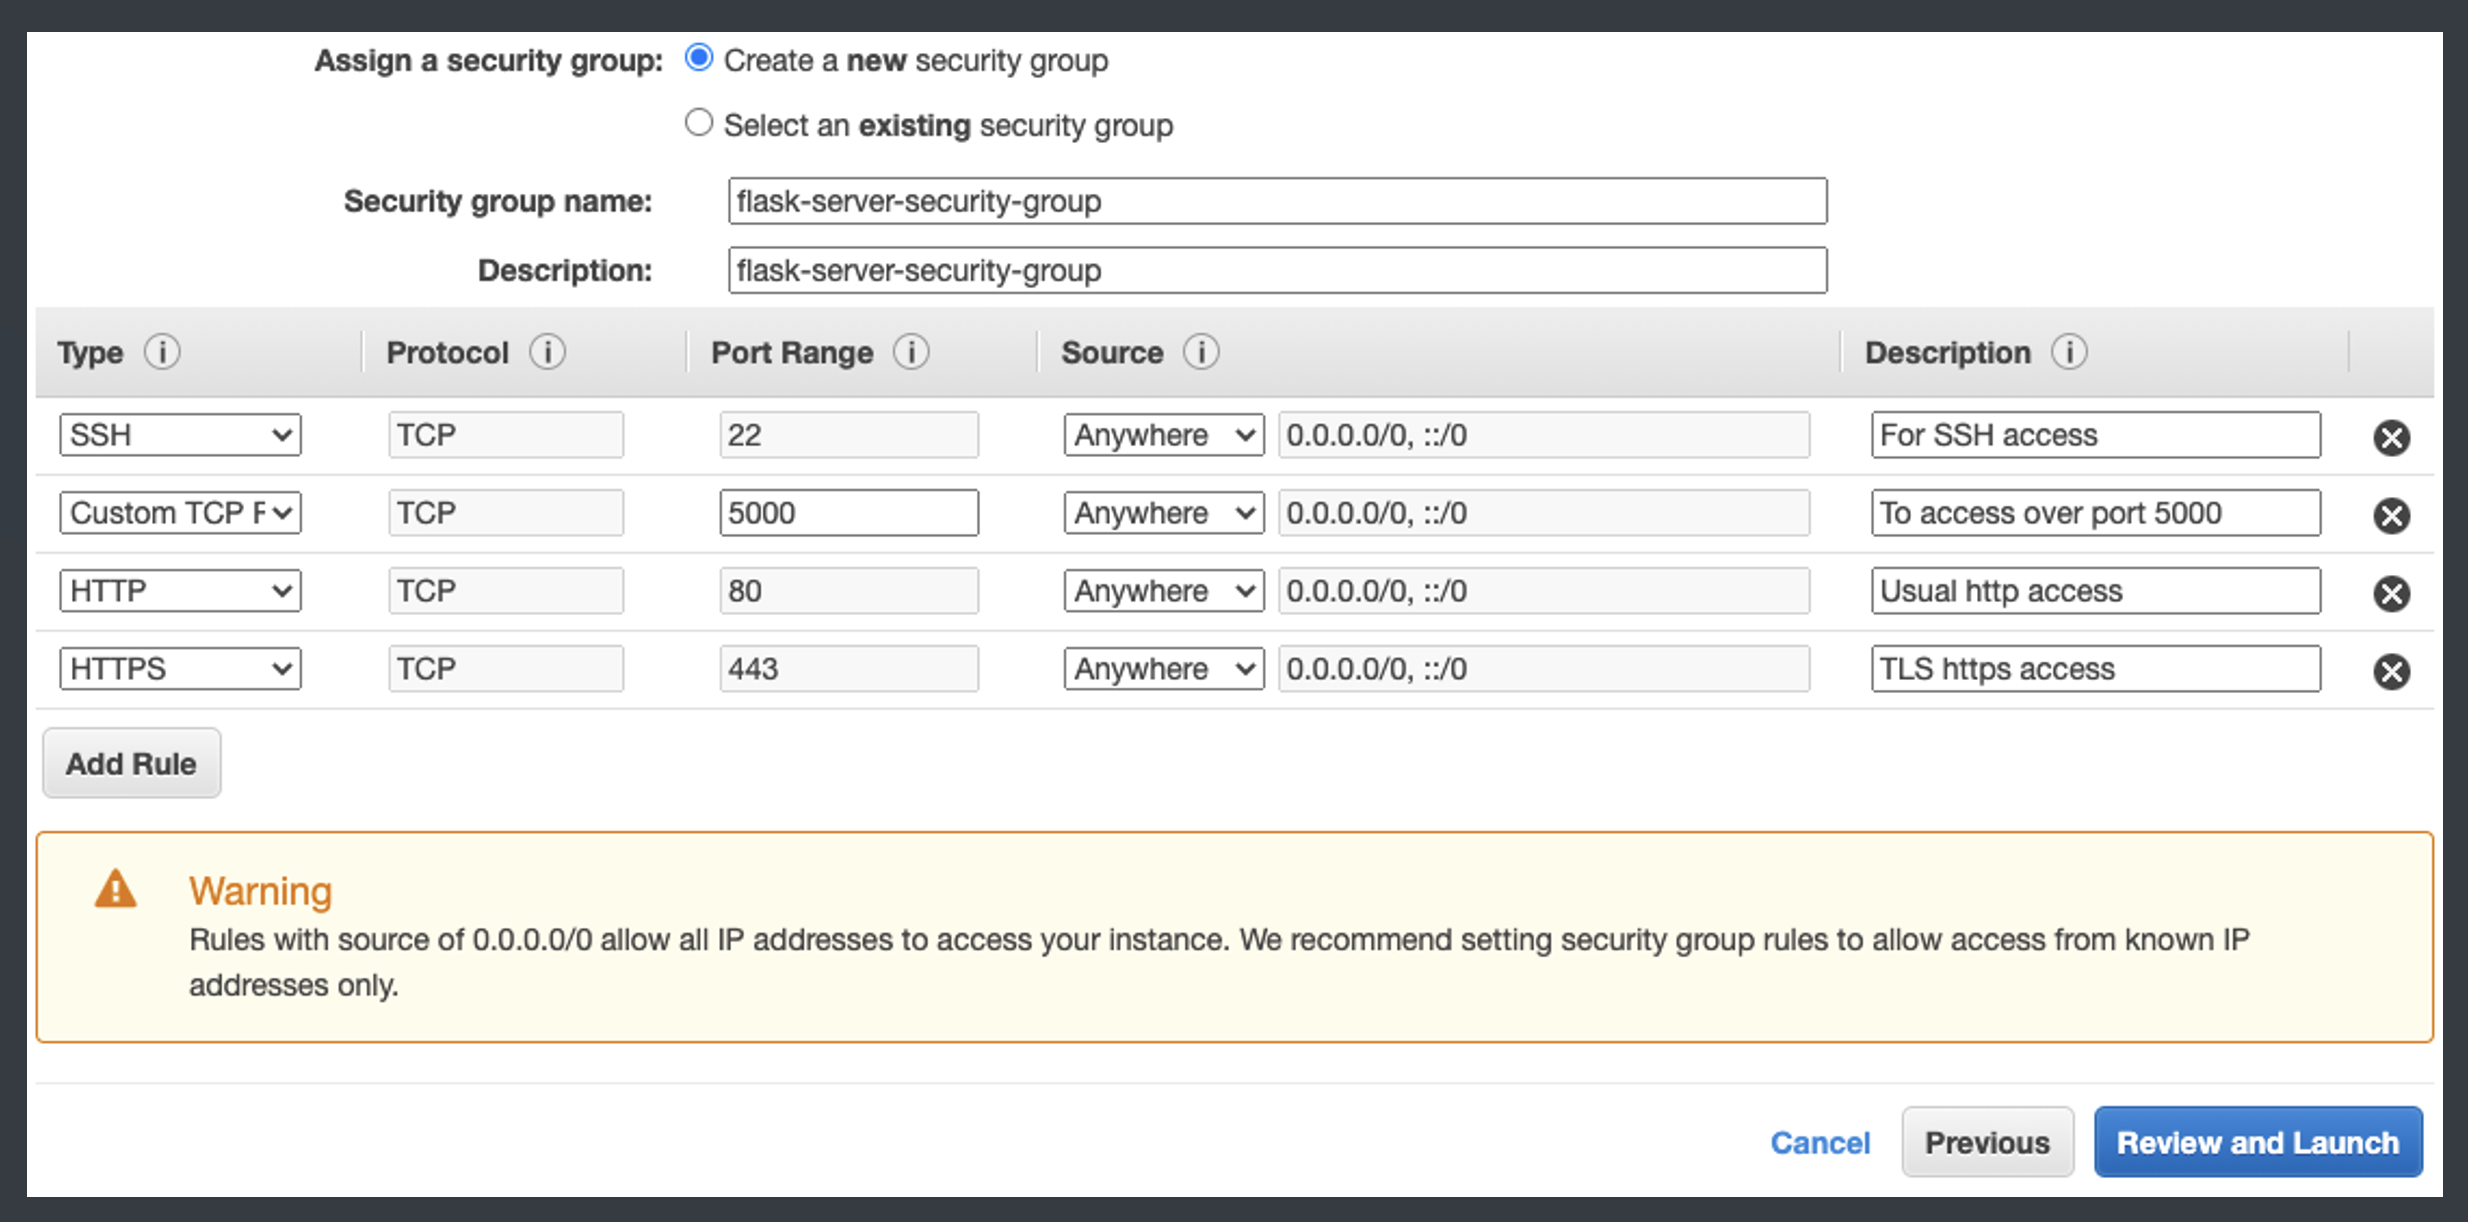
- When you get to the security screen choose Create a new security group and give it an appropriate name such as ‘flask-server-security-group’. We use these AWS security groups instead of our own firewall within the Ubuntu server. Enter the details shown in the screen shot below. For now we’re going to keep it very open by specifying that any IP address can access the server (0.0.0.0/0). When we’re finished we should alter the SSH entry so that it only allows your own laptop IP address to have SSH access. You can do this by typing ‘what is my ip address’ into google and noting your IP address and entering it as follows: ‘1.2.3.4/32’ (assuming your IP address is 1.2.3.4). AWS makes this easy by providing a ‘My IP’ option when changing the CIDR IP values for Security group values.
Click on Review and Launch to progress to the Review screen where you can review your choices and click on the Launch button.
- The last step involves creating a new SSH key pair and downloading it to your laptop. Enter a suitable name for the key pair and save it to your home directory or into your .ssh directory on your laptop. It can be saved anywhere but keep in mind it’s a security sensitive file so keep it safe. If you lose the file you may not be able to access your server in the future.
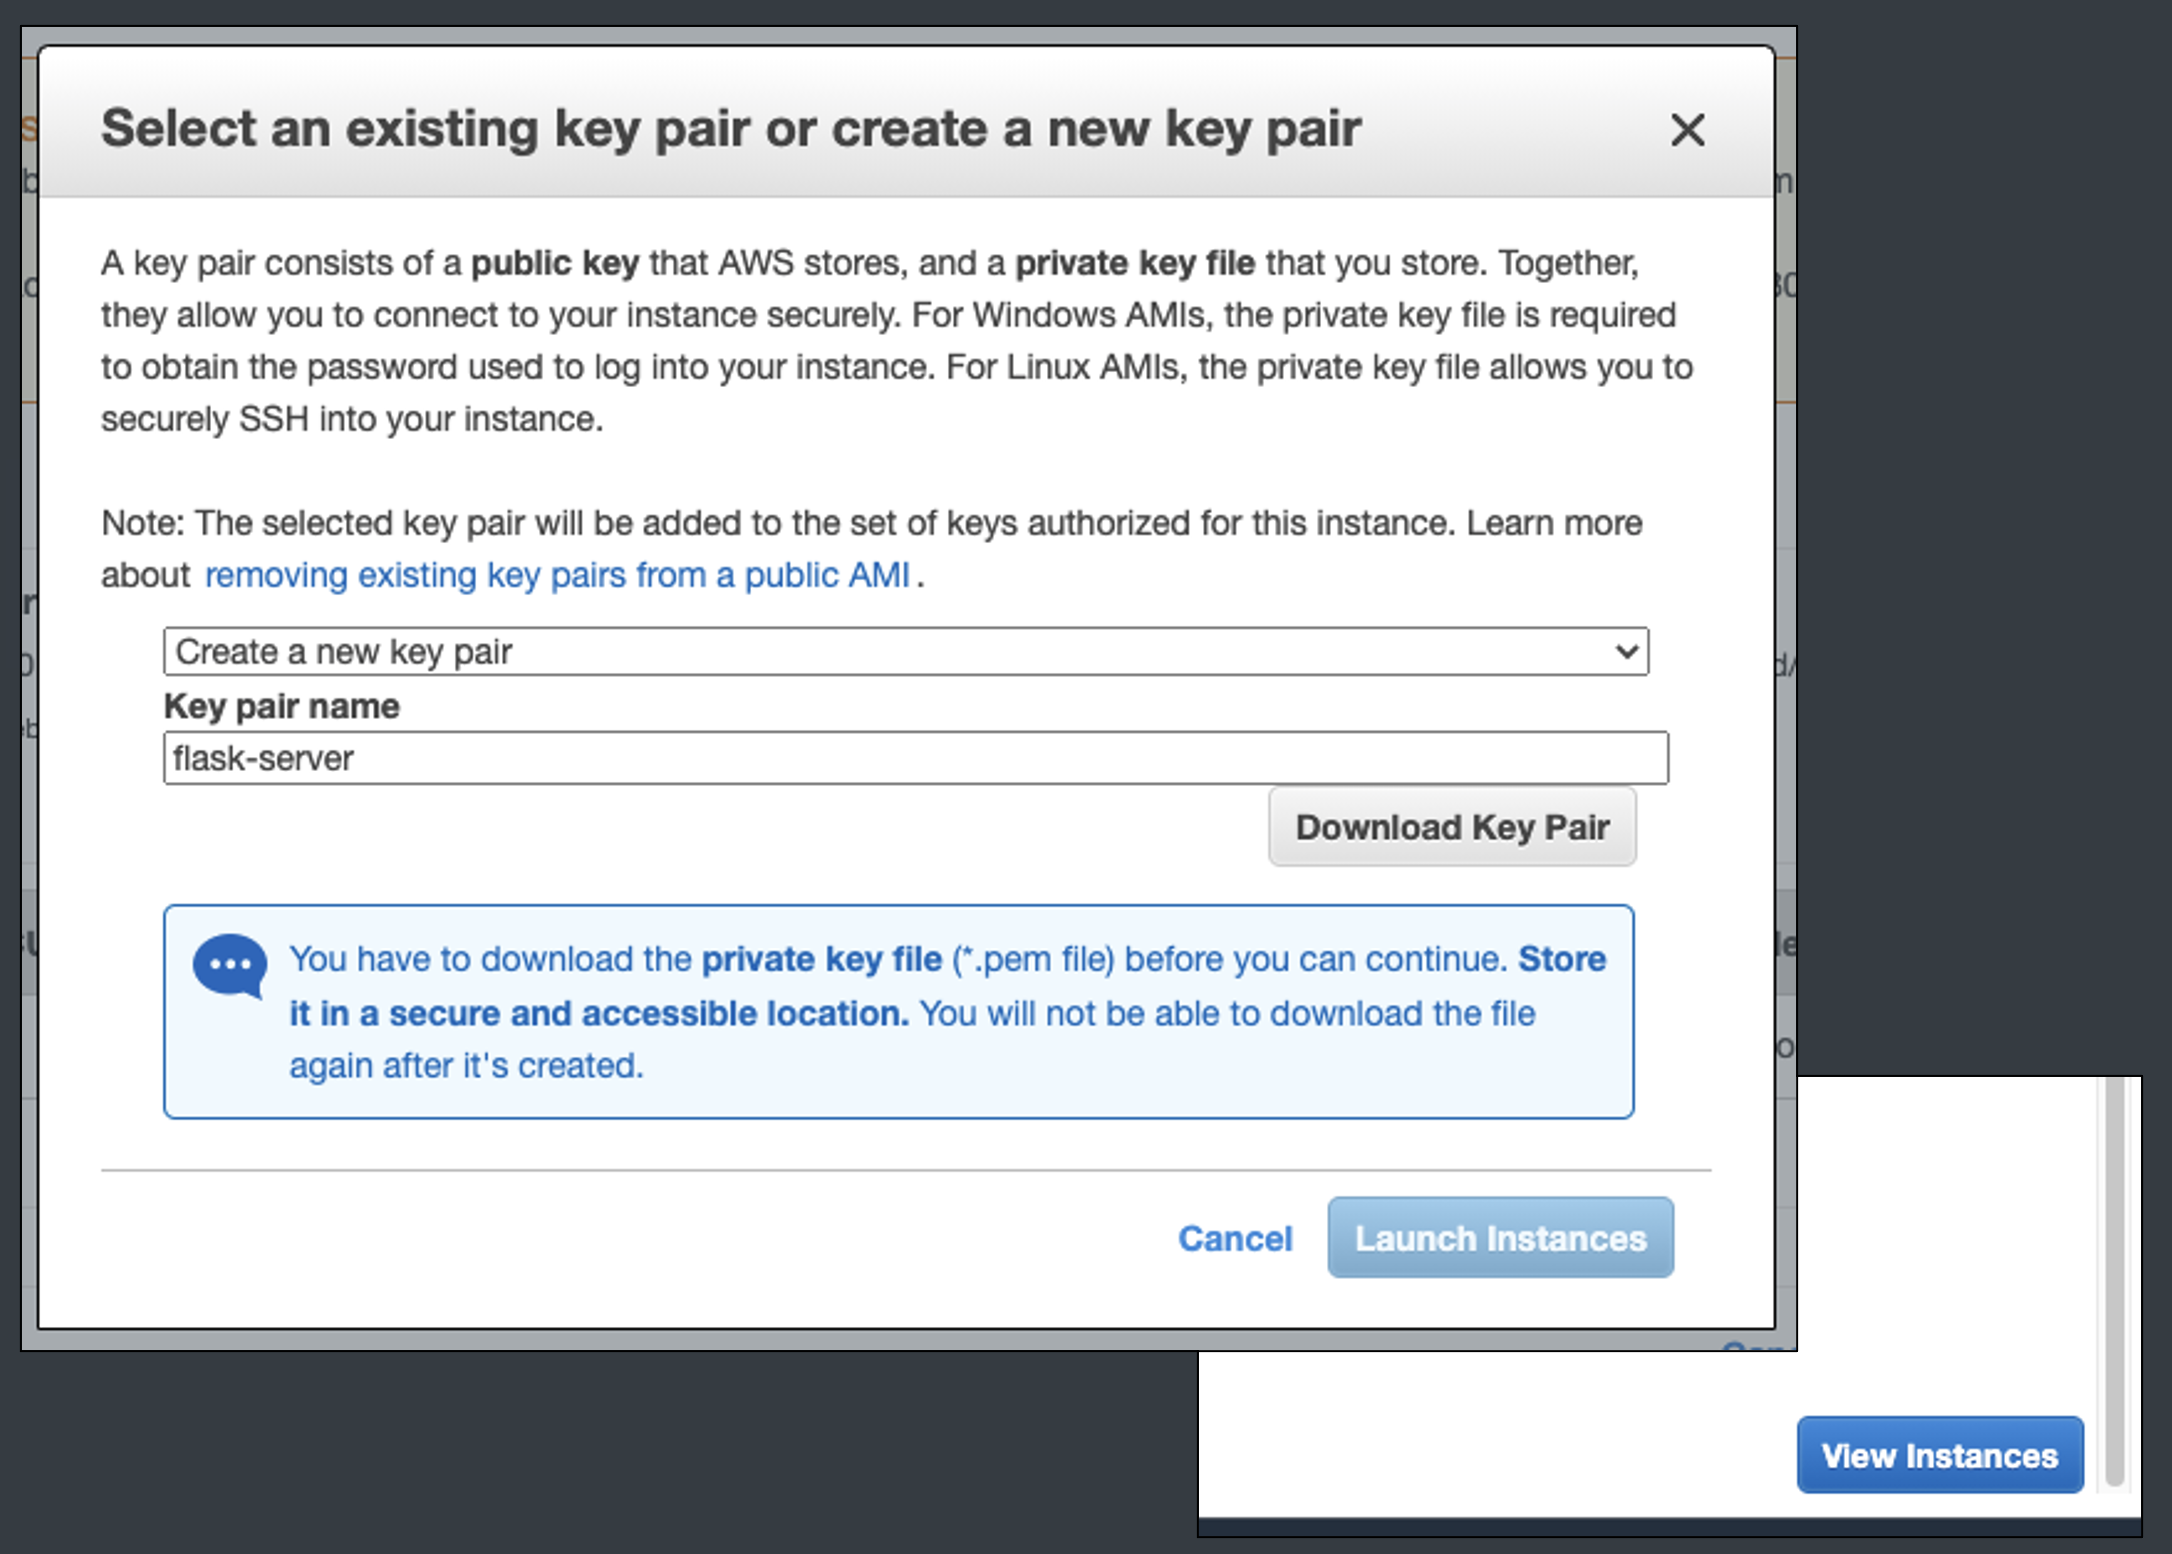
- Now we’re finished choosing the various options so all we have to do is click on the Launch Instances button to create the Ubuntu server and then navigate back to the EC2 Instances page or click on the VIew Instances button.
Next we’ll SSH into the server
- Linux Ubuntu computers can have a Mac/Windows style GUI, but our Ubuntu server doesn’t, so we will do everything from the command line interface (CLI) or shell terminal. In order to do this we need to gain secure access to the server from our local machine by launching an SSH terminal.
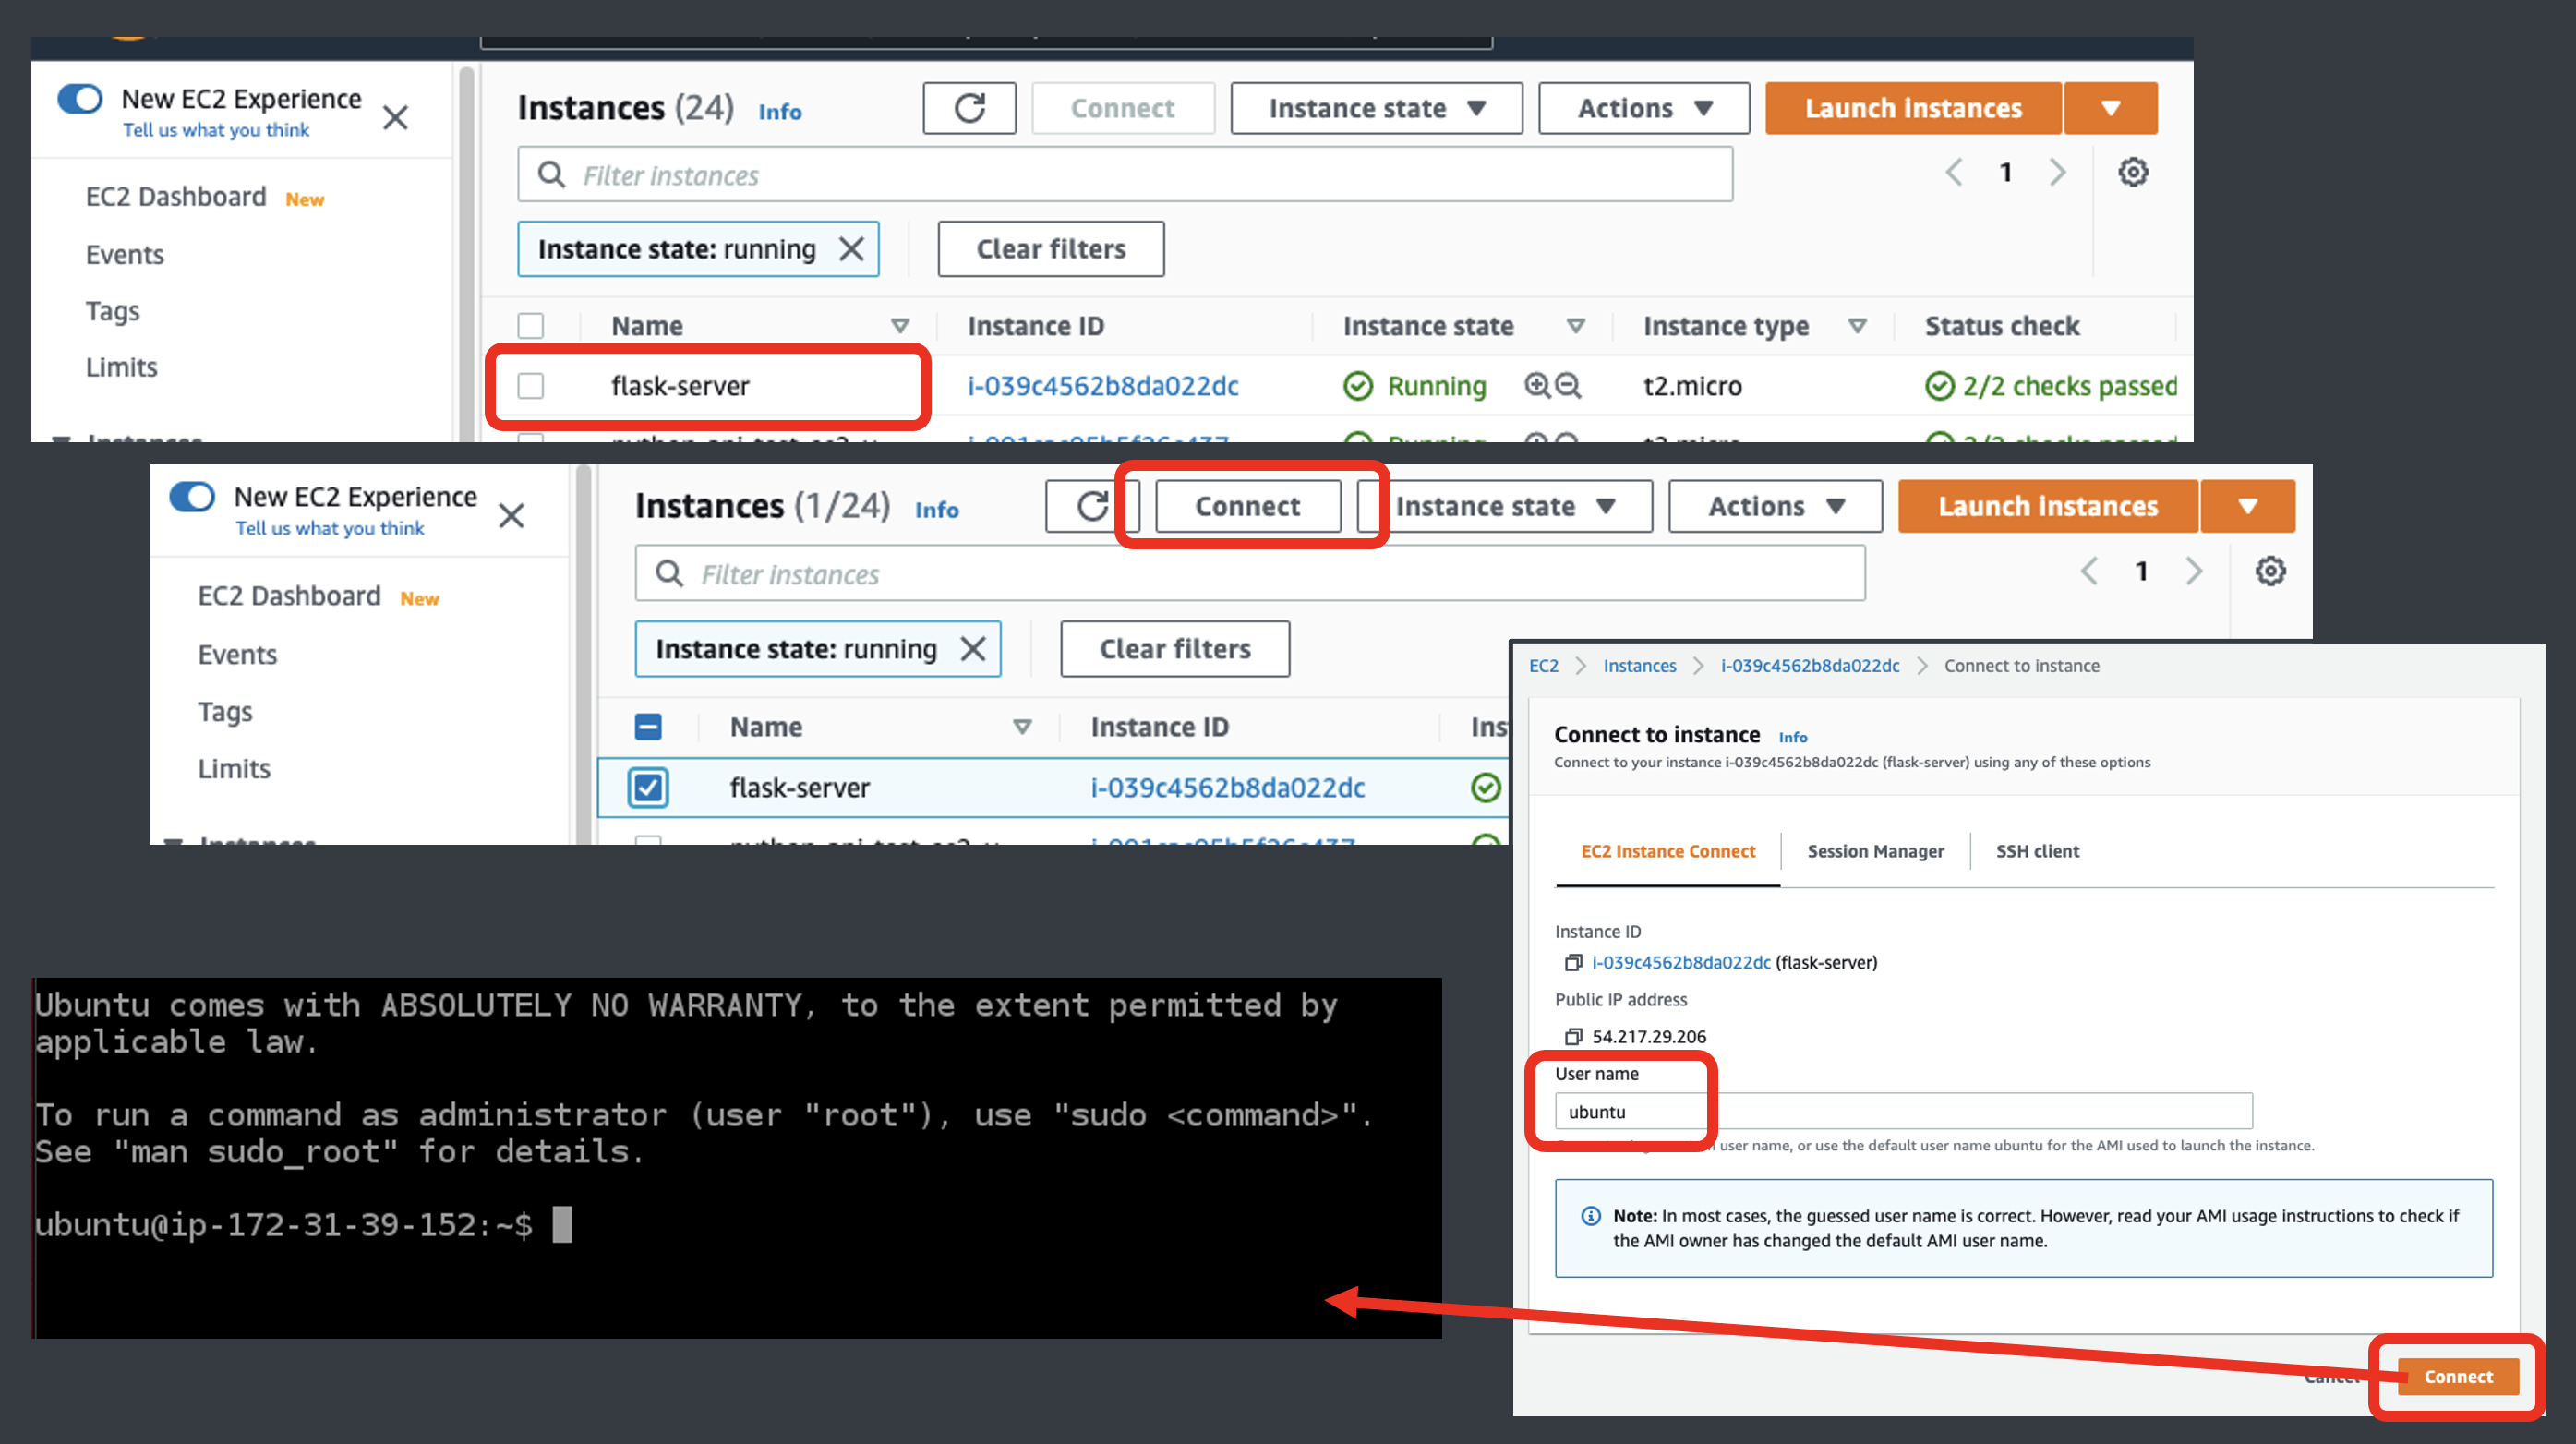
NOTE: if you’re on Windows you will need to use PuTTY or another method to SSH into the Ubuntu server. There are many excellent guides available on how to do this. Just google ‘using PuTTY to access an Ubuntu server’. Or you could use the EC2 Connect option from within the EC2 Instance page which will open a terminal shell within your browser.
-
While the above EC2 Connect option is handy, it’s better to use a terminal window. In order to SSH into the server, open a terminal window on your Mac (or use PuTTY on Windows). From this point onwards I’ll assume you’re on a Mac.
-
Remember the security file you downloaded earlier? I’m going to assume you named it ‘flask-server.pem’ and that you placed it into your home directory, so the path to the file is:
~/flask-server.pem. If your filename or file path is different then make sure to allow for this when reading the rest of this guide. When AWS launched my Ubuntu server, the public IP address they provided was54.217.29.206but remember to use your own Ubuntu server IP address for the remainder of this guide. -
Within the terminal window type:
➜ ssh -i ~/flask-server.pem ubuntu@54.217.29.206
and press enter.
- When you see
Are you sure you want to continue connecting (yes/no/[fingerprint])?type inyesand press enter. - You may get this error
ubuntu@54.217.29.206: Permission denied (publickey).. This means the AWS PEM file’s permissions are too open and you will need to issue this command:
➜ chmod 400 ~/flask-server.pem
When this is done you can again issue the first command and this will give you SSH access into the Ubuntu server. Here is the full process including all the information provided by the Ubuntu terminal:
➜ ssh -i ~/flask-server.pem ubuntu@54.217.29.206
The authenticity of host 54.217.29.206 (54.217.29.206) cant be established.
ECDSA key fingerprint is SHA256:y+RhUK1VE3PAL2brSs9Y0nNOvBrlPbMLNeYesadaKVI.
Are you sure you want to continue connecting (yes/no/[fingerprint])? yes
Warning: Permanently added 54.217.29.206 (ECDSA) to the list of known hosts.
@@@@@@@@@@@@@@@@@@@@@@@@@@@@@@@@@@@@@@@@@@@@@@@@@@@@@@@@@@@
@         WARNING: UNPROTECTED PRIVATE KEY FILE!          @
@@@@@@@@@@@@@@@@@@@@@@@@@@@@@@@@@@@@@@@@@@@@@@@@@@@@@@@@@@@
Permissions 0644 for 'flask-server.pem' are too open.
It is required that your private key files are NOT accessible by others.
This private key will be ignored.
Load key "flask-server.pem": bad permissions
ubuntu@54.217.29.206: Permission denied (publickey).
➜  chmod 400 flask-server.pem
➜  ssh -i ~/flask-server.pem ubuntu@54.217.29.206
Welcome to Ubuntu 20.04.2 LTS (GNU/Linux 5.4.0-1038-aws x86_64)

 * Documentation:  https://help.ubuntu.com
 * Management:     https://landscape.canonical.com
 * Support:        https://ubuntu.com/advantage

  System information as of Sun Mar  7 13:39:54 UTC 2021

  System load:  0.0               Processes:             101
  Usage of /:   16.9% of 7.69GB   Users logged in:       0
  Memory usage: 23%               IPv4 address for eth0: 172.31.39.152
  Swap usage:   0%

 * Introducing self-healing high availability clusters in MicroK8s.
   Simple, hardened, Kubernetes for production, from RaspberryPi to DC.

     https://microk8s.io/high-availability

1 update can be installed immediately.
0 of these updates are security updates.
To see these additional updates run: apt list --upgradable


The list of available updates is more than a week old.
To check for new updates run: sudo apt update
Failed to connect to https://changelogs.ubuntu.com/meta-release-lts. Check your Internet connection or proxy settings


Last login: Sun Mar  7 13:29:10 2021 from 18.202.216.50
To run a command as administrator (user "root"), use "sudo <command>".
See "man sudo_root" for details.

ubuntu@ip-172-31-39-152:~$
Now we have access to the Ubuntu server
-
Now that we’re in the Ubuntu shell we have some updates and changes to make to the server.
-
First we need to update the existing packages:
sudo apt update && sudo apt upgrade
-
For this command or for any in the future, if you get prompted
Do you want to continue? [Y/n]enterYto continue. -
Check the hostname:
hostname(it will usually be based on the VPS IP) -
(Optionally) change the hostname to ‘flask-server’ or something else:
sudo hostnamectl set-hostname flask-server -
Check the hostname again:
hostname(it will have changed)
ubuntu@ip-172-31-39-152:~$ hostname
ip-172-31-39-152
ubuntu@ip-172-31-39-152:~$ sudo hostnamectl set-hostname flask-server
ubuntu@ip-172-31-39-152:~$ hostname
flask-server
ubuntu@ip-172-31-39-152:~$
- For the remainder of this instruction I will assume we changed the hostname to: ‘flask-server’. If we were to reboot the server at this stage, then our command line prompt would look like this:
ubuntu@flask-server:~$instead ofubuntu@ip-172-31-39-152:~$
Within Ubuntu, there is a text editor called nano and we will use if for the remainder of this guide to create and edit text files. If you issue a command to edit a non-existent file, then nano will auto-create the file for you, but in some cases we will instead explicitly create the file before we use nano to edit it. When we do this we will use a linux command called touch to create the file and then use nano to edit the newly created file.
- Set the same hostname in our host file in the form of
<external IP or address> <hostname>:
sudo nano /etc/hosts
-
The above command will open the text file using nano and you can add this additional line to the text file:
54.217.29.206 flask-server -
Example of the text file with the additional line added to it:
127.0.0.1 localhost
54.217.29.206 flask-server

# The following lines are desirable for IPv6 capable hosts
::1 ip6-localhost ip6-loopback
fe00::0 ip6-localnet
ff00::0 ip6-mcastprefix
ff02::1 ip6-allnodes
ff02::2 ip6-allrouters
ff02::3 ip6-allhosts
Now we can deploy the Flask web app to the new server
There are many ways to get our Flask web app onto the server. We can clone it from Github or copy it from our local laptop onto the Ubuntu server. I’ll briefly explain how to go a Github clone or how to copy the files from your local laptop to Ubuntu, but if in doubt do some additional googling.
First, to clone the web app from a Github repository:
- From the Ubuntu users home folder (/home/ubuntu but NOT /var/www/html)
- Clone the app from Github:
git clone https://github.com/cathalgreaney/my-flask-app.git. Enter the path to your own Github repository and enter any username and passwords required. - The Github project may have some leading directories that don’t have any files in them and we can optionally remove these superfluous directories for convenience.
- If the folder structure is:
~/some-other-folder/my-flask-app/then we’ll remove the leading folder:sudo mv /home/ubuntu/some-other-folder/my-flask-app /home/ubuntu/my-flask-app
Or, maybe we just want to copy it from our local laptop to the server:
- From our local laptop terminal, let’s assume the project is contained in a local folder called
~/my-files/my-flask-appand we are going to copy it from there into the server. We can use the secure copy command as follows:scp -r ~/my-files/my-flask-app ubuntu@54.217.29.206:~/my-flask-app - Notice we use
-rin the scp command. This is important and it ensures all files and sub-folders are copied to the server.
Install Python
Now that the setup of the server is complete and we’ve copied our Flask web app onto the server it’s time to install the Python and Flask libraries. I’m going to include every step, but I won’t elaborate on the commands too much. If you’ve developed a Flask app then you’re going to be familiar with most of these commands already. However, when I’m discussing production specific aspects I will provide some additional context.
python3 -V
# Usually shows it's already installed
# but we will install anyway
sudo apt install python3-pip
sudo apt install python3-venv
python3 -m venv ~/my-flask-app/venv
source ~/my-flask-app/venv/bin/activate
pip install -r ~/my-flask-app/requirements.txt
# If we do not have a requirements.txt
# then manually install one by one
In the above series of commands we installed Python 3 and installed the Python virtual environment and created a new virtual environment within the project folder.
In the last command: pip install -r ~/my-flask-app/requirements.txt, we installed all the dependencies within the Flask web app. This command assumes you’ve already created a requirements.txt file in your project folder. If you haven’t, then you can do so by issuing this command on your local development laptop while you are inside of the virtual environment you used while developing your Flask web app: pip freeze > requirements.txt. This will list all the requirements and send them to a new requirements.txt file. Remember, you will have to copy this file from your local onto the server as follows: scp -r ~/my-files/my-flask-app/requirements.txt ubuntu@54.217.29.206:~/my-flask-app/requirements.txt
Install Flask
Make sure you are still inside the virtual environment on your server. If not then ensure you are in your home folder and issue these commands:
cd ~/
source ~/my-flask-app/venv/bin/activate
Now go ahead and install Flask:
# Within the virtual environment:
sudo apt install python3-flask
# (Optionally) Install CORS package if it was not in the requirements.txt
pip install flask_cors
- It’s good practice to keep all your security sensitive settings such as passwords and database end point information inside a special config.json file. If you’ve done this you will need to copy this file into the following location:
/etc/my-flask-app/config.json - Remember to update the path to this file within your Python code.
Now we can test the installation on the development server:
Quick Test of the Installation.. let’s use port 5000
Before we install and setup the production web server, we’ll use the Flask development server to test the web app. This is the same method you would use to test the code during development.
cd ~/my-flask-app/
export FLASK_APP=app.py
flask run --host=0.0.0.0 --port=5000
- In a web browser, enter:
http://54.217.29.206:5000/and you should see your web app appear as expected. This indicates the development web server is working. - However, many Flask web apps use additional modules such as links to MySql or PostgreSql and you should carry out tests to ensure these connections are functional. If you encounter errors when testing your database connections then you may need to install or update the openSSH libraries on the Ubuntu server.
- For example, if your Flask web app was acting as a Restful API server you could test it using Postman and run an example Restful call in order to test the MySql connection:
POST: http://54.217.29.206:5000/<some-endpoint>. If you get a successful login response then the database connection is working. If you see as error such as:mysql.connector.errors.InterfaceError: 2026 (HY000): SSL connection error: error:1425F102:SSL routines:ssl_choose_client_version:unsupported protocol, then it’s likely the openSSH package needs to be updated/installed. You can follow these instructions to install it:
Install openSSH for database access
- For more details on openSSH see this website. I’ve condensed the steps below:
openssl version -a
sudo apt install build-essential checkinstall zlib1g-dev -y
cd /usr/local/src/
sudo wget https://www.openssl.org/source/openssl-1.1.1c.tar.gz
sudo tar -xf openssl-1.1.1c.tar.gz
cd openssl-1.1.1c
sudo ./config --prefix=/usr/local/ssl --openssldir=/usr/local/ssl shared zlib

# This next three commands will take a few mins each to run:
sudo make
sudo make test

# If all tests are successful, then:
sudo make install
Now create a new text file with just this line: /usr/local/ssl/lib
cd /etc/ld.so.conf.d/
# create the following file
sudo nano openssl-1.1.1c.conf
# and enter this single line in the new file:
/usr/local/ssl/lib
sudo ldconfig -v
Edit an existing text file and add this line to it: PATH="/usr/local/sbin:/usr/local/bin:/usr/sbin:/usr/bin:/sbin:/bin:/usr/games:/usr/local/games:/usr/local/ssl/bin"
# Edit this file and add a new line
sudo nano /etc/environment
# Add this line:
PATH="/usr/local/sbin:/usr/local/bin:/usr/sbin:/usr/bin:/sbin:/bin:/usr/games:/usr/local/games:/usr/local/ssl/bin"
Finally:
# Continue with these commands:
source /etc/environment
echo $PATH
which openssl
openssl version -a
- Now we need to reboot the web server. When we do this we will lose our SSH connection to the server so we will have to wait about 2-3 minutes for the reboot to occur and then SSH back into the web server. On a side note, when we do SSH back in after the reboot you might notice the command line shows the new hostname we changed earlier.
- To reboot issue this command:
sudo reboot
and after 2 mins try to SSH back in.
Quick Test of the Installation after installing openSSH.. again using port 5000
cd ~/my-flask-app/
export FLASK_APP=app.py
flask run --host=0.0.0.0 --port=5000
- Again, check in a browser and then in Postman. All should be good.
Install the Production Web Server Nginx and the Python interpreter Gunicorn
First Nginx:
-
We can’t use the development server (flask run) for production environments, so we install Nginx web server to serve up the static pages and Gunicorn to work in tandem with Nginx to interpret the Python code.
-
While still in the virtual environment (
source ~/my-flask-app/venv/bin/activate):
sudo apt install nginx
pip install gunicorn
- We will remove the default nginx config file:
sudo rm /etc/nginx/sites-enabled/default - and create a new one:
sudo nano /etc/nginx/sites-enabled/my-flask-appand place this text inside the new file:
server {
        listen 80;
        server_name 54.217.29.206;

        location /static {
                alias /home/ubuntu/my-flask-app/static;
        }

        location / {
                proxy_pass http://localhost:8000;
                include /etc/nginx/proxy_params;
                proxy_redirect off;
        }
}
-
Note: when developing Flask apps we usually place static html and css files into a folder here:
/home/ubuntu/my-flask-app/static. If your project doesn’t have static files then it might be a good idea to create a ‘static’ folder and just have a placeholder file in there for testing the Nginx installation. -
Restart nginx:
sudo systemctl restart nginx
Now for Gunicorn:
- First we have to check how many CPU cores are on our machine:
nproc --all
- To calculate the number of Gunicorn workers (needed in the next step), it should be 2x the number of cores on your server plus 1 so: (2x cores) + 1
- If you had 2 cores, then you would run 5 Gunicorn workers (threads).
- Go to the project directory:
cd ~/my-flask-app/ - If we wanted to run on port 80:
gunicorn -w 5 <entry py file name>:app
For example:
gunicorn -w 5 app:app
assuming the name of the entry py file is app.py
- But we want to run on port 5000 so we will use:
gunicorn --bind 0.0.0.0:5000 -w 5 app:app
-
Again, test on the browser and on Postman and all should be good.
-
We’re now running on Nginx/Gunicorn which is suitable for production, but we want Gunicron to run, restart, start automatically etc, so we will use Supervisor for this:
Install and use Supervisor
- While still in the Python virtual environment:
sudo apt install supervisor
- Now create a Supervisor configuration file for our Flask project:
sudo nano /etc/supervisor/conf.d/my-flask-app.conf
- The file should contain the following:
[program:my-flask-app]
directory=/home/ubuntu/my-flask-app
command=/home/ubuntu/my-flask-app/venv/bin/gunicorn --bind 0.0.0.0:5000 -w 5 app:app
user=ubuntu
autostart=true
autorestart=true
stopasgroup=true
killasgroup=true
stderr_logfile=/var/log/my-flask-app/my-flask-app.err.log
stdout_logfile=/var/log/my-flask-app/my-flask-app.out.log
- Now we need to create the log directories (use the -p flag to create all directories in the command):
sudo mkdir -p /var/log/my-flask-app
- and the blank log files:
sudo touch /var/log/my-flask-app/my-flask-app.err.log
sudo touch /var/log/my-flask-app/my-flask-app.out.log
- Now restart Supervisor:
sudo supervisorctl reload
-
That’s it!!! Supervisor is running and has triggered the Gunicron production ready Python Flask service. You should be able to exit the SSH terminal and test your app on a browser and it should be working perfectly. If your server reboots, is unexpectedly shut down and restarted then your Flask web app should recover gracefully and continue to operate as expected.
-
In the future, anytime you update your Python Flask code, you should reload Supervisor.
sudo supervisorctl reload
Congratulations on installing your Flask web app on a production level web server
Some guidance for those not using AWS
You may be using an Ubuntu server on a more generic service that does not automatically create SSH keys and does not provide a security firewall service to open and close ports. Also, you may want to create your own Ubuntu user so that you can restrict access to that user. The following section gives some guidance.
Install your own firewall on your Ubuntu server.
Remember earlier we configured the AWS security service to allow the following:
- SSH access to all IP addresses on port 22
- TCP access to all IP addresses on port 5000
- HTTP access to all IP addresses on port 80 (actually for the above steps we didn’t need this, but you would undoubtedly need this when providing your service to the general public)
- HTTPS access to all IP addresses on port 443 (again we didn’t use this, but you would very likely be installing a TLS certificate for security purposes and would use port 443 to give HTTPS access)
If we’re not on AWS we can add this kind of firewall access within our own Ubuntu server very easily using a package called uncomplicated firewall (ufw).
sudo apt install ufw
sudo ufw default allow outgoing
sudo ufw default deny incoming
sudo ufw allow ssh
sudo ufw allow 5000
sudo ufw allow http
sudo ufw allow https
sudo ufw enable
sudo ufw status
sudo systemctl restart nginx
sudo supervisorctl reload
In the above set of commands we installed ufw, allowed all outgoing traffic by default (fairly standard and generally safe), denied all incoming traffic by default and opened port 22(ssh), port 5000, port 80 and port 443(http and https). We could have just specified all the port numbers instead of the shorthand. That is sudo ufw allow https and sudo ufw allow 443 are equivalent. We also restarted the nginx server and reloaded Supervisor when we were finished changing our firewall settings.
Create a new user and a new SSH token on our Ubuntu server.
AWS automatically created a SSH token for us and associates it with the default ubuntu user on the server. This is not always the case when creating a new Ubuntu server. The default user is usually called ‘ubuntu’ but we often gain initial default access to the server by using a username and password instead of using a SSH key. This is inherenly less secure so here is a way to create a new Ubuntu user and associated SSH key and then to disallow general access to the server using usernames and passwords.
Accessing server using SSH keys and user/passwords
Because different service providers give access to new servers in different ways I’ll give an example here of using an SSH key and using a username/password. In the remaining steps in this guide I’ll just refer to the SSH key method but you can substitue the user/password method if that is what is available to you. By the time you’re finished with this section you can disable user/password access altogether and just use SSH tokens.
Using SSH Tokens (as we’ve been doing up to now):
- User is ‘root’ and we are using a SSH token:
-ssh -i ~/.ssh/some-token.pem root@54.217.29.206 - User is ‘ubuntu’ and we are using a SSH token:
-ssh -i ~/.ssh/some-token.pem ubuntu@54.217.29.206 - User is ‘cathalgreaney’ and we are using a SSH token:
-ssh -i ~/.ssh/some-token.pem cathalgreaney@54.217.29.206
Using User/password:
- User is ‘root’ and we are using a password. We use the following command and enter the password when prompted:
-ssh root@54.217.29.206 -p 22 - User is ‘root’ and we are using a password and we are using a non-standard port 2221 for SSH access:
-ssh root@54.217.29.206 -p 2221 - User is ‘ubuntu’ and we are using a password:
-ssh ubuntu@54.217.29.206 -p 22 - User is ‘cathalgreaney’ and we are using a password:
-ssh cathalgreaney@54.217.29.206 -p 22
Now with that out of the way, let’s add the new user
- We SSH into the Ubuntu server as the default Ubuntu user and create a user with limited privileges
ssh -i ~/.ssh/some-token.pem ubuntu@54.217.29.206
# OR is using user/password:
ssh ubuntu@54.217.29.206 -p 22

sudo adduser cathalgreaney
# provide the new password for the new cathalgreaney user

# add the user to the sudo group
sudo adduser cathalgreaney sudo

# switch to the 'cathalgreaney' user
su - cathalgreaney
# entering the new password when prompted
Here is the full procedure:
ubuntu@flask-server:~$ sudo adduser cathalgreaney

Adding user `cathalgreaney' ...
Adding new group `cathalgreaney' (1001) ...
Adding new user `cathalgreaney' (1001) with group `cathalgreaney' ...
Creating home directory `/home/cathalgreaney' ...
Copying files from `/etc/skel' ...

New password:
Retype new password:

passwd: password updated successfully
Changing the user information for cathalgreaney
Enter the new value, or press ENTER for the default
	Full Name []: Cathal Greaney
	Room Number []:
	Work Phone []:
	Home Phone []:
	Other []:
Is the information correct? [Y/n] Y
ubuntu@flask-server:~$ sudo adduser cathalgreaney sudo
Adding user `cathalgreaney' to group `sudo' ...
Adding user cathalgreaney to group sudo
Done.

ubuntu@flask-server:~$ su - cathalgreaney
Password:

To run a command as administrator (user "root"), use "sudo <command>".
See "man sudo_root" for details.

cathalgreaney@flask-server:~$
Notice the command asks us to provide a Full name, Room Number etc. These are all optional and all can be skipped my pressing enter. Also notice that our command prompt has changed from ubuntu@flask-server:~$ to cathalgreaney@flask-server:~$ which indicates we’re logged in as a different user.
Now for the SSH token
- Now we’re going to setup SSH access for this
cathalgreaneyuser by first creating a hidden .ssh directory:
mkdir ~/.ssh
- Now BACK IN YOUR LOCAL MAC laptop
- (google creating a SSH key in windows if you are on a windows machine):
- Make sure we’re in our home directory:
cd ~
ssh-keygen -b 4096
Enter file in which to save the key (/Users/cathal/.ssh/id_rsa):
Stick to the default (just press enter) and leave the passphrase empty by again clicking enter twice. This generated two files:
- an id_rsa file that we keep on our local and
- an id_rsa.pub file that we will be copying or moving to our linux server
- Now we copy the file to linux:
scp ~/.ssh/id_rsa.pub cathalgreaney@54.217.29.206:/home/cathalgreaney/.ssh/authorized_keys
This command may not work due to access issues, so instead copy the file to a temp directory in the ubuntu users home and then do a ‘mv’ from there to the cathalgreaney home from within the linux server. After doing this the file will be in the cathalgreaney home folder but will still be owned by the ubuntu user so do this:
- From within the
/home/cathalgreaney/.sshdirectory
sudo chown cathalgreaney:cathalgreaney authorized_keys
NOW BACK IN UBUNTU:
- Go to the
cd /home/cathalgreaney/.sshdirectory - Set permissions for the .ssh directory so the owner of the directory has read, write and execute permissions on the directory and the owner of the files in that directory has read and write permissions on the files
cd /home/cathalgreaney/.ssh
sudo chmod 700 ~/.ssh/
sudo chmod 600 ~/.ssh/*
- Now we can exit the Ubunty server and SSH back in to test the new process:
ssh -i ~/.ssh/some-token.pem cathalgreaney@54.217.29.206
Now that we have SSH access for our new user, we will disable general access using user/pass:
- Let’s prevent SSH login using the root user:
sudo nano /etc/ssh/sshd_config - In the file change this line:
#PermitRootLogin prohibit-passwordto this:
PermitRootLogin no
#LoginGraceTime 2m
PermitRootLogin no
#StrictModes yes
#MaxAuthTries 6
#MaxSessions 10
- Change
PasswordAuthentication yestoPasswordAuthentication nobecause we’re using SSH from now on - Restart the SSH service:
sudo systemctl restart sshd
And that’s it!!!